There are several tutorials about how to install Nutch 2.x with HBase and Solr. However, with all of them I found errors. In this post I am going to describe how I made the integration of these products. The integration was made with:
These versions are very important, because if you use another combination of versions, the stack will likely not work.
In our case, we are going to install a basic example under the directory /Applications/searchengine in an OSX version 1.8.5. Nevertheless, in some points we will explain some issues for Windows and Linux.
After extracting hbase, you need to configure it. Go to hbase-site.xml, which you will find in /conf and modify it with:
<configuration>
    <property>
        <name>hbase.rootdir</name>
        <value>/Applications/searchengine/hbase-data</value>
    </property>
    <property>
        <name>hbase.zookeeper.property.dataDir</name>
        <value>/Applications/searchengine/hbase-zookeeper-data</value>
    </property>
</configuration>
Next, you need to specify the Gora backend in $NUTCH_HOME/conf/nutch-site.xml.
<configuration>
        <property>
                <name>storage.data.store.class</name>
                <value>org.apache.gora.hbase.store.HBaseStore</value>
                <description>Default class for storing data</description>
        </property>
</configuration>
After that, ensure the HBase gora-hbase dependency is available in $NUTCH_HOME/ivy/ivy.xml.
<!-- Uncomment this to use HBase as Gora backend. -->
<dependency org="org.apache.gora" name="gora-hbase" rev="0.5" conf="\*->default" />
Then make sure that HBaseStore is set as the default data store in the gora.properties file. You will find this file in /conf. Add the following line:
gora.datastore.default=org.apache.gora.hbase.store.HBaseStore
Now go to nutch home directory and type the following command from your terminal:
ant runtime
This will build your Apache Nutch and create the respective directories in the Apache Nutch's home directory. It is needed because Apache Nutch 2.x is only distributed as source code. Your will need ant 1.9.x version in order to build nutch 2.x properly, mainly, if you use java 1.8. We had to update ant versión. Basically, what we did was:
- Download and unzip latest version of ant
- Copy new version of ant under /Library directory.
- Remove current symbolic link of ant
- Create a new symbolic link pointing to new ant
In the following extract you can see what was done:
LostInSoftware:Library lostinsoftware$ ant -version
Apache Ant(TM) version 1.8.4 compiled on March 7 2013
LostInSoftware:Library lostinsoftware$
LostInSoftware:apache-nutch-2.3 lostinsoftware$ which ant
/usr/bin/ant
LostInSoftware:apache-nutch-2.3 lostinsoftware$ ls -la /usr/bin/ant
lrwxr-xr-x  1 root  wheel  22 19 jun  2013 /usr/bin/ant -> /usr/share/ant/bin/ant
LostInSoftware:apache-nutch-2.3 lostinsoftware$ ls -la /usr/share/ant
lrwxr-xr-x  1 root  wheel  14 19 jun  2013 /usr/share/ant -> java/ant-1.8.4
LostInSoftware:apache-nutch-2.3 lostinsoftware$ ls -la /usr/share/java/ant-1.8.4/
total 16
drwxr-xr-x   7 root  wheel    238  8 mar  2013 .
drwxr-xr-x   9 root  wheel    306 19 jun  2013 ..
-rw-r--r-- 1 root  wheel  15289 19 jun  2013 LICENSE.txt
-rw-r--r-- 1 root  wheel    218 19 jun  2013 NOTICE.txt
drwxr-xr-x   8 root  wheel    272  8 mar  2013 bin
drwxr-xr-x  15 root  wheel    510  8 mar  2013 etc
drwxr-xr-x  50 root  wheel   1700 28 dic  2013 lib
LostInSoftware:apache-nutch-2.3 lostinsoftware$
LostInSoftware:apache-nutch-2.3 lostinsoftware$ cd /Library/
LostInSoftware:Library lostinsoftware$ sudo mkdir ant-1.9.6
Password:
LostInSoftware:Library lostinsoftware$
LostInSoftware:Library lostinsoftware$ sudo cp -r /Users/Shared/Downloads/ant/apache-ant-1.9.6 /Library/ant-1.9.6
LostInSoftware:Library lostinsoftware$ sudo rm /usr/share/ant
LostInSoftware:Library lostinsoftware$ cd  /usr/share/
LostInSoftware:share lostinsoftware$ sudo ln -s /Library/ant-1.9.6  ant
LostInSoftware:share lostinsoftware$ ant -version
Apache Ant(TM) version 1.9.6 compiled on June 29 2015
Part of the result of executing ant runtime is:
LostInSoftware:apache-nutch-2.3 lostinsoftware$ ant runtime
Buildfile: /Applications/searchengine/apache-nutch-2.3/build.xml
Trying to override old definition of task javac
  [taskdef] Could not load definitions from resource org/sonar/ant/antlib.xml. It could not be found.

ivy-probe-antlib:

ivy-download:
  [taskdef] Could not load definitions from resource org/sonar/ant/antlib.xml. It could not be found.

ivy-download-unchecked:

ivy-init-antlib:

ivy-init:

init:

clean-lib:
   [delete] Deleting directory /Applications/searchengine/apache-nutch-2.3/build/lib

resolve-default:
[ivy:resolve] :: Apache Ivy 2.3.0 - 20130110142753 :: http://ant.apache.org/ivy/ ::
[ivy:resolve] :: loading settings :: file = /Applications/searchengine/apache-nutch-2.3/ivy/ivysettings.xml
  [taskdef] Could not load definitions from resource org/sonar/ant/antlib.xml. It could not be found.
.
.
.
.
.

deploy:
     [copy] Copying 1 file to /Applications/searchengine/apache-nutch-2.3/build/plugins/urlnormalizer-regex

copy-generated-lib:
     [copy] Copying 1 file to /Applications/searchengine/apache-nutch-2.3/build/plugins/urlnormalizer-regex

compile:

job:
      [jar] Building jar: /Applications/searchengine/apache-nutch-2.3/build/apache-nutch-2.3.job

runtime:
    [mkdir] Created dir: /Applications/searchengine/apache-nutch-2.3/runtime
    [mkdir] Created dir: /Applications/searchengine/apache-nutch-2.3/runtime/local
    [mkdir] Created dir: /Applications/searchengine/apache-nutch-2.3/runtime/deploy
     [copy] Copying 1 file to /Applications/searchengine/apache-nutch-2.3/runtime/deploy
     [copy] Copying 2 files to /Applications/searchengine/apache-nutch-2.3/runtime/deploy/bin
     [copy] Copying 1 file to /Applications/searchengine/apache-nutch-2.3/runtime/local/lib
     [copy] Copying 1 file to /Applications/searchengine/apache-nutch-2.3/runtime/local/lib/native
     [copy] Copying 30 files to /Applications/searchengine/apache-nutch-2.3/runtime/local/conf
     [copy] Copying 2 files to /Applications/searchengine/apache-nutch-2.3/runtime/local/bin
     [copy] Copying 148 files to /Applications/searchengine/apache-nutch-2.3/runtime/local/lib
     [copy] Copying 145 files to /Applications/searchengine/apache-nutch-2.3/runtime/local/plugins
     [copy] Copied 2 empty directories to 2 empty directories under /Applications/searchengine/apache-nutch-2.3/runtime/local/test

BUILD SUCCESSFUL
Total time: 1 minute 22 seconds
LostInSoftware:apache-nutch-2.3 lostinsoftware$
The tree structure of the generated directories would be as shown in the following picture:
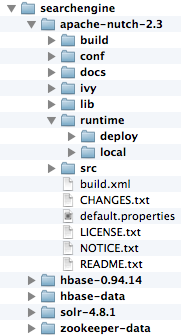
The most important directory is runtime, which containts all the necessary scripts which are required for crawling.
Now, make sure HBase is started and is working properly. Previously, JAVA_HOME environment variable must be properly set. Then, to check whether HBase is running properly, go to the home directory of Hbase. Type the following command from your terminal:
./bin/hbase shell
You will get an output as follows:
LostInSoftware:hbase-0.94.14 lostinsoftware$ pwd
/Applications/searchengine/hbase-0.94.14
LostInSoftware:hbase-0.94.14 lostinsoftware$ ./bin/hbase shell
HBase Shell; enter 'help<RETURN>' for list of supported commands.
Type "exit<RETURN>" to leave the HBase Shell
Version 0.94.14, r1543222, Mon Nov 18 23:23:33 UTC 2013

hbase(main):001:0> exit
LostInSoftware:hbase-0.94.14 lostinsoftware$
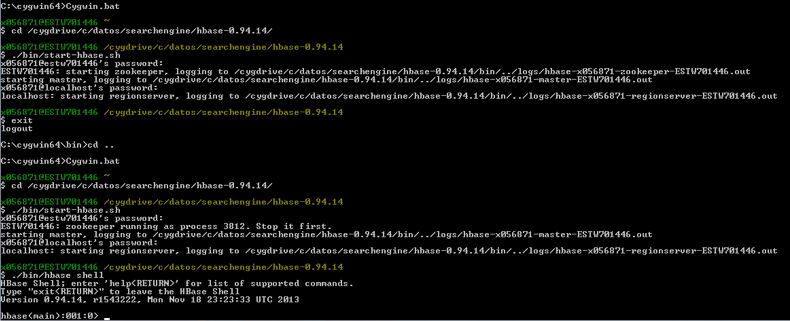
Setting up HBase on Windows
If you are installing on Windows, you will need cygwin to start HBase. You can follow instructions on this page in order to set up HBase on Windows. Be careful: due to a bug, you will need to create a dummy file, such as, zzz.jar, under hbase/lib. If you do not create this file, you will get an error similar to:
java.lang.NoClassDefFoundError: org/apache/zookeeper/KeeperException
More information about this error is on this page.
Besides, do not forget to set parameter export HBASE_MANAGES_ZK=false in hbase-env.sh.
Besides, in hbase-site.xml add:
<property>
   <name>hbase.zookeeper.quorum</name>
   <value>localhost</value>
</property>

<property>
   <name>hbase.zookeeper.property.clientPort</name>
   <value>2182</value>
</property>
in order to avoid error
Could not start ZK at requested port of 2181.
You can get more information at this link.
Part of the installation you can see in the following images:
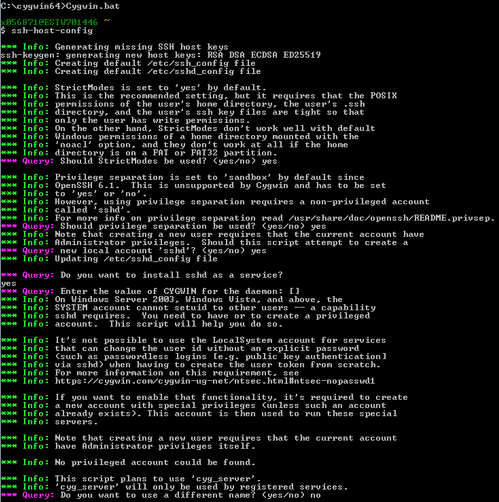
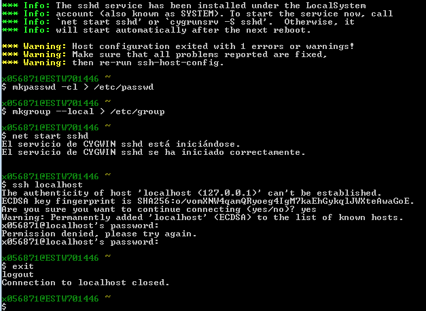
Starting Hbase on Windows:
Verifying Apache Nutch installation
The installation of Nutch is finished. In order to verify your Apache Nutch installation, go to /runtime/local and type the following command:
bin/nutch
You will get an output as follows:
LostInSoftware:local lostinsoftware$ pwd
/Applications/searchengine/apache-nutch-2.3/runtime/local
LostInSoftware:local lostinsoftware$ bin/nutch
Usage: nutch COMMAND
where COMMAND is one of:
 inject		inject new urls into the database
 hostinject     creates or updates an existing host table from a text file
 generate 	generate new batches to fetch from crawl db
 fetch 		fetch URLs marked during generate
 parse 		parse URLs marked during fetch
 updatedb 	update web table after parsing
 updatehostdb   update host table after parsing
 readdb 	read/dump records from page database
 readhostdb     display entries from the hostDB
 index          run the plugin-based indexer on parsed batches
 elasticindex   run the elasticsearch indexer - DEPRECATED use the index command instead
 solrindex 	run the solr indexer on parsed batches - DEPRECATED use the index command instead
 solrdedup 	remove duplicates from solr
 solrclean      remove HTTP 301 and 404 documents from solr - DEPRECATED use the clean command instead
 clean          remove HTTP 301 and 404 documents and duplicates from indexing backends configured via plugins
 parsechecker   check the parser for a given url
 indexchecker   check the indexing filters for a given url
 plugin 	load a plugin and run one of its classes main()
 nutchserver    run a (local) Nutch server on a user defined port
 webapp         run a local Nutch web application
 junit         	runs the given JUnit test
 or
 CLASSNAME 	run the class named CLASSNAME
Most commands print help when invoked w/o parameters.
LostInSoftware:local lostinsoftware$
Crawling websites
Crawling is driven by the Apache Nutch crawling tool and certain related tools for building and maintaining several data structures. It includes web database, the index, and a set of segments. The steps for crawlin are:
-
Add an agent name in the value field of the http.agent.name property in the nutch-site.xml file.
<property>
   <name>http.agent.name</name>
   <value>My Nutch Spider</value>
</property> -
Under directory runtime/local, create a directory called urls.
mkdir -p urls

If you are using Windows

mkdir urls -
Then you have to create a file called seed.txt, under urls. Inside this file your will put the urls you want to crawl; one url per line. For example (in Linux or Mac),
echo "http://nutch.apache.org" >> urls/seed -
In order to filter URLs for crawling, you will have to edit the regex-urlfilter.txt file. This file is self-explanatory. Lines starting with + will include the url into the indexes and lines starting with - will ignore the url.
Integration of Solr with Nutch
First of all, you need to download Solr and unzip it. In our case, Solr was installed under /Applications/searchengine/solr-4.8.1/ Then you have to export SOLR_HOME environment variable. You can do that into your .bash_profile or .bashrc. For example, export SOLR_HOME=/Applications/searchengine/solr-4.8.1/example/solr. Now, you can start Solr going to the example directory under your Apache Solr's home (export SOLR_HOME=/Applications/searchengine/solr-4.8.1/example) and typing:
java -jar start.jar
You will get the following output:
LostInSoftware:example lostinsoftware$ pwd
/Applications/searchengine/solr-4.8.1/example
LostInSoftware:example lostinsoftware$ java -jar start.jar
0    [main] INFO  org.eclipse.jetty.server.Server  – jetty-8.1.10.v20130312
20   [main] INFO  org.eclipse.jetty.deploy.providers.ScanningAppProvider  – Deployment monitor /Applications/searchengine/solr-4.8.1/example/contexts at interval 0
25   [main] INFO  org.eclipse.jetty.deploy.DeploymentManager  – Deployable added: /Applications/searchengine/solr-4.8.1/example/contexts/solr-jetty-context.xml
86   [main] INFO  org.eclipse.jetty.webapp.WebInfConfiguration  – Extract jar:file:/Applications/searchengine/solr-4.8.1/example/webapps/solr.war!/ to /Applications/searchengine/solr-4.8.1/example/solr-webapp/webapp
1650 [main] INFO  org.eclipse.jetty.webapp.StandardDescriptorProcessor  – NO JSP Support for /solr, did not find org.apache.jasper.servlet.JspServlet
1762 [main] INFO  org.apache.solr.servlet.SolrDispatchFilter  – SolrDispatchFilter.init()
1843 [main] INFO  org.apache.solr.core.SolrResourceLoader  – JNDI not configured for solr (NoInitialContextEx)
1843 [main] INFO  org.apache.solr.core.SolrResourceLoader  – solr home defaulted to 'solr/' (could not find system property or JNDI)
1844 [main] INFO  org.apache.solr.core.SolrResourceLoader  – new SolrResourceLoader for directory: 'solr/'
1927 [main] INFO  org.apache.solr.core.ConfigSolr  – Loading container configuration from /Applications/searchengine/solr-4.8.1/example/solr/solr.xml
2150 [main] INFO  org.apache.solr.core.CoresLocator  – Config-defined core root directory: /Applications/searchengine/solr-4.8.1/example/solr
2195 [main] INFO  org.apache.solr.core.CoreContainer  – New CoreContainer 1117519786
2196 [main] INFO  org.apache.solr.core.CoreContainer  – Loading cores into CoreContainer [instanceDir=solr/]
2205 [main] INFO  org.apache.solr.handler.component.HttpShardHandlerFactory  – Setting socketTimeout to: 0
2205 [main] INFO  org.apache.solr.handler.component.HttpShardHandlerFactory  – Setting urlScheme to: null
2208 [main] INFO  org.apache.solr.handler.component.HttpShardHandlerFactory  – Setting connTimeout to: 0
2209 [main] INFO  org.apache.solr.handler.component.HttpShardHandlerFactory  – Setting maxConnectionsPerHost to: 20
2209 [main] INFO  org.apache.solr.handler.component.HttpShardHandlerFactory  – Setting corePoolSize to: 0
.
.
.
.
.
3864 [coreLoadExecutor-4-thread-1] INFO  org.apache.solr.core.CoreContainer  – registering core: collection1
3868 [main] INFO  org.apache.solr.servlet.SolrDispatchFilter  – user.dir=/Applications/searchengine/solr-4.8.1/example
3868 [main] INFO  org.apache.solr.servlet.SolrDispatchFilter  – SolrDispatchFilter.init() done
3921 [searcherExecutor-5-thread-1] INFO  org.apache.solr.core.SolrCore  – [collection1] webapp=null path=null params={q=static+firstSearcher+warming+in+solrconfig.xml&distrib=false&event=firstSearcher} hits=0 status=0 QTime=56
3922 [searcherExecutor-5-thread-1] INFO  org.apache.solr.core.SolrCore  – QuerySenderListener done.
3922 [searcherExecutor-5-thread-1] INFO  org.apache.solr.handler.component.SpellCheckComponent  – Loading spell index for spellchecker: default
3922 [searcherExecutor-5-thread-1] INFO  org.apache.solr.handler.component.SpellCheckComponent  – Loading spell index for spellchecker: wordbreak
3922 [searcherExecutor-5-thread-1] INFO  org.apache.solr.handler.component.SuggestComponent  – Loading suggester index for: mySuggester
3923 [searcherExecutor-5-thread-1] INFO  org.apache.solr.spelling.suggest.SolrSuggester  – reload()
3923 [searcherExecutor-5-thread-1] INFO  org.apache.solr.spelling.suggest.SolrSuggester  – build()
3936 [main] INFO  org.eclipse.jetty.server.AbstractConnector  – Started SocketConnector@0.0.0.0:8983
3939 [searcherExecutor-5-thread-1] INFO  org.apache.solr.core.SolrCore  – [collection1] Registered new searcher Searcher@7ed8905[collection1] main{StandardDirectoryReader(segments_1:1:nrt)}
87635 [qtp2110245805-12] INFO  org.apache.solr.servlet.SolrDispatchFilter  – [admin] webapp=null path=/admin/cores params={indexInfo=false&wt=json&_=1446902983593} status=0 QTime=1
88009 [qtp2110245805-12] INFO  org.apache.solr.servlet.SolrDispatchFilter  – [admin] webapp=null path=/admin/info/system params={wt=json&_=1446902983691} status=0 QTime=278
Hit the following URL on your browser: http://localhost:8983/solr/admin/ and you will get the image of Running Apache Solr on your browser, as shown in the following screenshot:
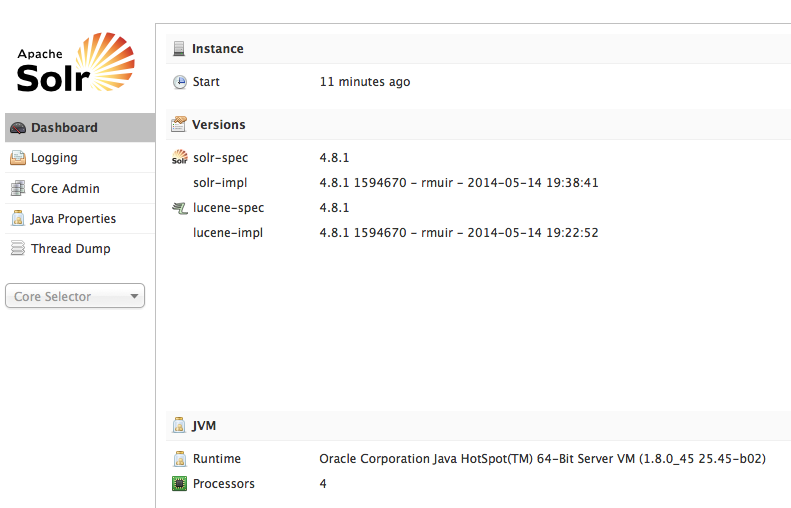 Solr can be started from Tomcat, JBoss and so on, but in this post, Solr has been started as standalone application.
Next copy the schema.xml file from <nutch_home>/conf to java -jar start.jar
At this moment almost everything is ready to crawl your website. The only thing left to do is to set the property plugin.includes in nutch-site.xml files both under runtime/local/conf and /conf directories. The final nutch-site.xml under /conf is:
<configuration>
    <property>
        <name>storage.data.store.class</name>
        <value>org.apache.gora.hbase.store.HBaseStore</value>
        <description>Default class for storing data</description>
    </property>
    <property>
      <name>plugin.includes</name>
      <value>protocol-httpclient|urlfilter-regex|index-(basic|more)|query-(basic|site|url|lang)|indexer-solr|nutch-extensionpoints|protocol-httpclient|urlfilter-regex|parse-(text|html|msexcel|msword|mspowerpoint|pdf)|summary-basic|scoring-opic|urlnormalizer-(pass|regex|basic)protocol-http|urlfilter-regex|parse-(html|tika|metatags)|index-(basic|anchor|more|metadata)</value>

    </property>
</configuration>
The final nutch-size.xml under runtime/local/conf is:
<configuration>
    <property>
        <name>storage.data.store.class</name>
        <value>org.apache.gora.hbase.store.HBaseStore</value>
        <description>Default class for storing data</description>
    </property>

    <property>
        <name>http.agent.name</name>
        <value>My Nutch Spider</value>
    </property>

    <property>
      <name>plugin.includes</name>
      <value>protocol-httpclient|urlfilter-regex|index-(basic|more)|query-(basic|site|url|lang)|indexer-solr|nutch-extensionpoints|protocol-httpclient|urlfilter-regex|parse-(text|html|msexcel|msword|mspowerpoint|pdf)|summary-basic|scoring-opic|urlnormalizer-(pass|regex|basic)protocol-http|urlfilter-regex|parse-(html|tika|metatags)|index-(basic|anchor|more|metadata)</value>
    </property>

</configuration>
This configure of the property plugin.includes prevents from the error
No IndexWriters activated - check your configuration
when the crawling of the websites starts.
Finally, follow the next steps in order to start the crawling of the websites:
-
Go to the home directory of HBase and execute:
./bin/start-hbase.shYou will get the following output:starting master, logging to /Applications/searchengine/hbase-0.94.14/bin/../logs/hbase-lostinsoftware-master-LostInSoftware.local.out
-
Now go to the local directory of Apache Nutch and type the following command
bin/crawl urls/seed.txt TestCrawl http://localhost:8983/solr/ 2
The meaning of each parameter of the command is:
- urls/seed.txt: seed.txt is the file which contains urls for crawling
- TestCrawl: This is the crawl data directory which will be automatically created inside Apache Hbase with the name TestCrawl_Webpage, which will contain information on all the URLs which are crawled by Apache Nutch.
- http://localhost:8983/solr/: This is the URL of running Apache Solr.
- 2: This is the number of iterations, which will tell Apache Nutch in how many iterations this crawling will end.
If all succeeds, you will get the following output:
LostInSoftware:local lostinsoftware$ bin/crawl urls/seed.txt TestCrawl http://localhost:8983/solr/ 2
Injecting seed URLs
/Applications/searchengine/apache-nutch-2.3/runtime/local/bin/nutch inject urls/seed.txt -crawlId TestCrawl
InjectorJob: starting at 2015-11-07 23:09:31
InjectorJob: Injecting urlDir: urls/seed.txt
InjectorJob: Using class org.apache.gora.hbase.store.HBaseStore as the Gora storage class.
InjectorJob: total number of urls rejected by filters: 0
InjectorJob: total number of urls injected after normalization and filtering: 1
Injector: finished at 2015-11-07 23:09:33, elapsed: 00:00:01
.
.
.
Generating a new fetchlist
/Applications/searchengine/apache-nutch-2.3/runtime/local/bin/nutch generate -D mapred.reduce.tasks=2 -D mapred.child.java.opts=-Xmx1000m -D mapred.reduce.tasks.speculative.execution=false -D mapred.map.tasks.speculative.execution=false -D mapred.compress.map.output=true -topN 50000 -noNorm -noFilter -adddays 0 -crawlId TestCrawl -batchId 1446934174-17387
GeneratorJob: starting at 2015-11-07 23:09:34
GeneratorJob: Selecting best-scoring urls due for fetch.
GeneratorJob: starting
GeneratorJob: filtering: false
GeneratorJob: normalizing: false
GeneratorJob: topN: 50000
GeneratorJob: finished at 2015-11-07 23:09:51, time elapsed: 00:00:17
GeneratorJob: generated batch id: 1446934174-17387 containing 16 URLs
Fetching :
/Applications/searchengine/apache-nutch-2.3/runtime/local/bin/nutch fetch -D mapred.reduce.tasks=2 -D mapred.child.java.opts=-Xmx1000m -D mapred.reduce.tasks.speculative.execution=false -D mapred.map.tasks.speculative.execution=false -D mapred.compress.map.output=true -D fetcher.timelimit.mins=180 1446934174-17387 -crawlId TestCrawl -threads 50
FetcherJob: starting at 2015-11-07 23:09:52
FetcherJob: batchId: 1446934174-17387
FetcherJob: threads: 50
FetcherJob: parsing: false
FetcherJob: resuming: false
FetcherJob : timelimit set for : 1446944992489
Using queue mode : byHost
Fetcher: threads: 50
fetching http://nutch.apache.org/apidocs/apidocs-1.5/index.html (queue crawl delay=5000ms)
QueueFeeder finished: total 16 records. Hit by time limit :0
Fetcher: throughput threshold: -1
Fetcher: throughput threshold sequence: 5
50/50 spinwaiting/active, 1 pages, 0 errors, 0.2 0 pages/s, 2 2 kb/s, 15 URLs in 1 queues
fetching http://nutch.apache.org/apidocs/apidocs-2.2.1/index.html (queue crawl delay=5000ms)
50/50 spinwaiting/active, 2 pages, 0 errors, 0.2 0 pages/s, 2 2 kb/s, 14 URLs in 1 queues
fetching http://nutch.apache.org/apidocs/apidocs-1.9/index.html (queue crawl delay=5000ms)
.
.
.
Parsing http://nutch.apache.org/bot.html
Parsing http://nutch.apache.org/credits.html
Parsing http://nutch.apache.org/downloads.html
Parsing http://nutch.apache.org/index.html
Parsing http://nutch.apache.org/javadoc.html
Parsing http://nutch.apache.org/mailing\_lists.html
Parsing http://nutch.apache.org/version\_control.html
ParserJob: success
ParserJob: finished at 2015-11-07 23:17:35, time elapsed: 00:00:23
CrawlDB update for TestCrawl
/Applications/searchengine/apache-nutch-2.3/runtime/local/bin/nutch updatedb -D mapred.reduce.tasks=2 -D mapred.child.java.opts=-Xmx1000m -D mapred.reduce.tasks.speculative.execution=false -D mapred.map.tasks.speculative.execution=false -D mapred.compress.map.output=true 1446934335-4863 -crawlId TestCrawl
DbUpdaterJob: starting at 2015-11-07 23:17:36
DbUpdaterJob: batchId: 1446934335-4863
DbUpdaterJob: finished at 2015-11-07 23:18:10, time elapsed: 00:00:33
Indexing TestCrawl on SOLR index -> http://localhost:8983/solr/
/Applications/searchengine/apache-nutch-2.3/runtime/local/bin/nutch index -D mapred.reduce.tasks=2 -D mapred.child.java.opts=-Xmx1000m -D mapred.reduce.tasks.speculative.execution=false -D mapred.map.tasks.speculative.execution=false -D mapred.compress.map.output=true -D solr.server.url=http://localhost:8983/solr/ -all -crawlId TestCrawl
IndexingJob: starting
Active IndexWriters :
SOLRIndexWriter
    solr.server.url : URL of the SOLR instance (mandatory)
    solr.commit.size : buffer size when sending to SOLR (default 1000)
    solr.mapping.file : name of the mapping file for fields (default solrindex-mapping.xml)
    solr.auth : use authentication (default false)
    solr.auth.username : username for authentication
    solr.auth.password : password for authentication

IndexingJob: done.
SOLR dedup -> http://localhost:8983/solr/
/Applications/searchengine/apache-nutch-2.3/runtime/local/bin/nutch solrdedup -D mapred.reduce.tasks=2 -D mapred.child.java.opts=-Xmx1000m -D mapred.reduce.tasks.speculative.execution=false -D mapred.map.tasks.speculative.execution=false -D mapred.compress.map.output=true http://localhost:8983/solr/
LostInSoftware:local lostinsoftware$
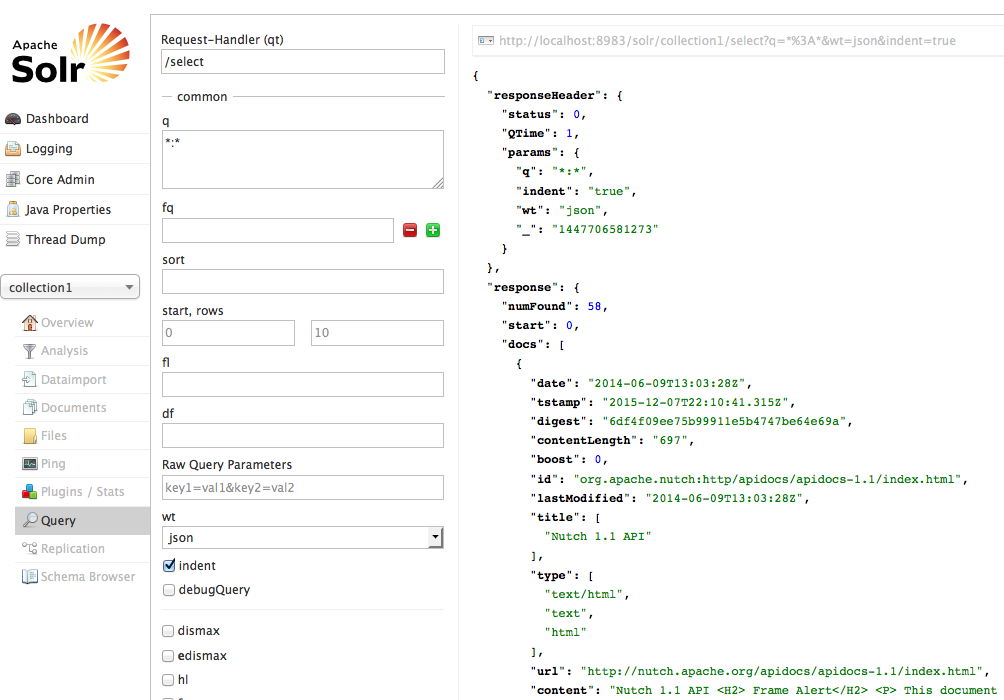
Now you can search for document using Solr console: