The Google Plugin for Eclipse lets you create, test, and upload App Engine applications from within Eclipse. The Google Plugin for Eclipse also makes it easy to develop applications using Google Web Toolkit (GWT), to run on App Engine or in any other environment. However, this plugin doesn't use Maven. In this post we are going to explain how to manage dependencies in a GAE project using Eclipse and Maven.
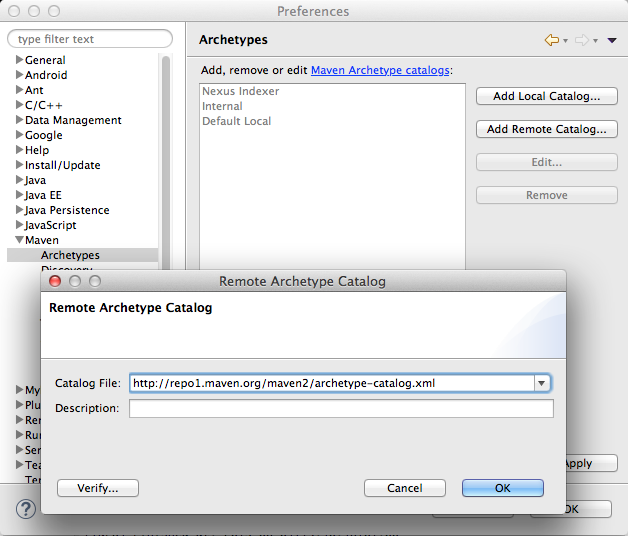
Firstly, we have to add a new maven remote catalog going to Preferences > Maven > Archetypes providing url http://repo1.maven.org/maven2/archetype-catalog.xml.
Now we can create a new maven project using google appengine archetypes as in the following image is shown
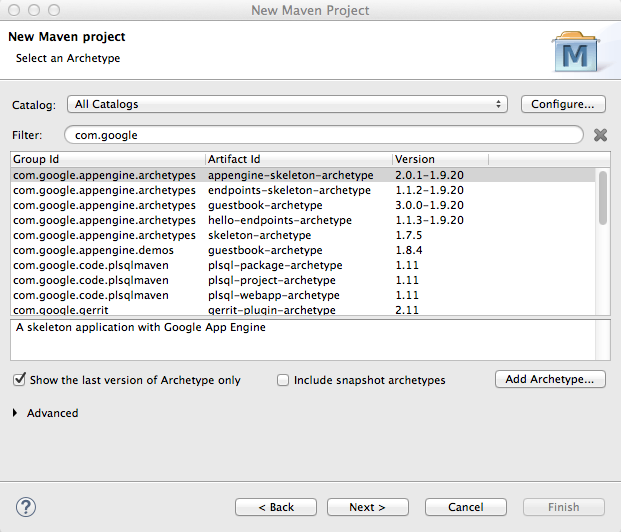
We will usually select the archetype com.google.appengine.archetypes:appengine-skeleton-archetype. Given we are working with Eclipse, we delete nbactions.xml, because this file is for Netbeans. Creating a project in this way, you will get the following error in the pom.xml file:
Plugin execution not covered by lifecycle configuration: org.codehaus.mojo:versions-maven-plugin:2.1:display-dependency-updates (execution: default, phase: compile)
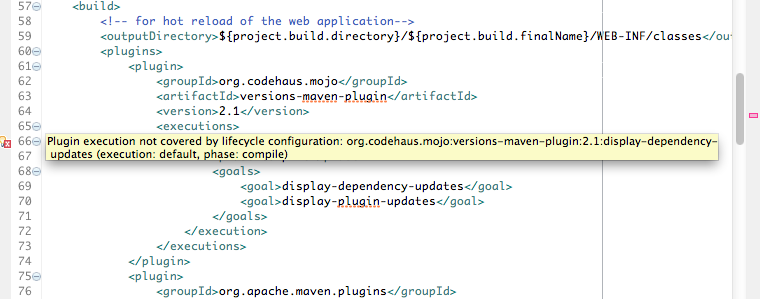
You need to wrap the section plugins with the tag pluginManagement. The correct code is:
<pluginManagement>
  <plugins>
    <plugin>
      <groupId>org.codehaus.mojo</groupId>
      <artifactId>versions-maven-plugin</artifactId>
      <version>2.1</version>
      <executions>
        <execution>
          <phase>compile</phase>
          <goals>
            <goal>display-dependency-updates</goal>
            <goal>display-plugin-updates</goal>
          </goals>
        </execution>
      </executions>
    </plugin>
    <plugin>
      <groupId>org.apache.maven.plugins</groupId>
      <version>3.1</version>
      <artifactId>maven-compiler-plugin</artifactId>
      <configuration>
        <source>1.7</source>
        <target>1.7</target>
      </configuration>
    </plugin>
    <plugin>
      <groupId>org.apache.maven.plugins</groupId>
      <artifactId>maven-war-plugin</artifactId>
      <version>2.4</version>
      <configuration>
        <archiveClasses>true</archiveClasses>
        <webResources>
          <!-- in order to interpolate version from pom into appengine-web.xml -->
          <resource>
            <directory>${basedir}/src/main/webapp/WEB-INF</directory>
            <filtering>true</filtering>
            <targetPath>WEB-INF</targetPath>
          </resource>
        </webResources>
      </configuration>
    </plugin>

    <plugin>
      <groupId>com.google.appengine</groupId>
      <artifactId>appengine-maven-plugin</artifactId>
      <version>${appengine.version}</version>
      <configuration>
        <enableJarClasses>false</enableJarClasses>
        <version>${app.version}</version>
        <!-- Comment in the below snippet to bind to all IPs instead of just
          localhost -->
        <!-- address>0.0.0.0</address> <port>8080</port -->
        <!-- Comment in the below snippet to enable local debugging with a
          remote debugger like those included with Eclipse or IntelliJ -->
        <!-- jvmFlags> <jvmFlag>-agentlib:jdwp=transport=dt\_socket,address=8000,server=y,suspend=n</jvmFlag>
          </jvmFlags -->
      </configuration>
    </plugin>
    <plugin>
      <groupId>com.google.appengine</groupId>
      <artifactId>gcloud-maven-plugin</artifactId>
      <version>${gcloud.plugin.version}</version>
      <configuration>
        <set\_default>true</set\_default>
      </configuration>
    </plugin>
  </plugins>
</pluginManagement>
Be careful with line 49. By default, this line is missing.
We need to add after the tag the following code:
<plugins>
  <plugin>
    <groupId>com.google.appengine</groupId>
    <artifactId>appengine-maven-plugin</artifactId>
  </plugin>
</plugins>
If we don't add this code, we will get the following error while we run the application:
Failed to execute goal com.google.appengine:appengine-maven-plugin:1.9.20:devserver (default-cli) on project _application-name_: Execution default-cli of goal com.google.appengine:appengine-maven-plugin:1.9.20:devserver failed. NoSuchElementException -> [Help 1]
If you are going to develop applications with Datastore and JDO, and you want to change the default version, you will have to add, for example, the following dependencies in pom.xml:
<!-- javax.jdo -->
<dependency>
  <groupId>com.google.appengine.orm</groupId>
  <artifactId>datanucleus-appengine</artifactId>
  <version>2.1.2</version>
  <scope>runtime</scope>
</dependency>
<dependency>
  <groupId>org.datanucleus</groupId>
  <artifactId>datanucleus-core</artifactId>
  <version>3.1.3</version>
  <scope>runtime</scope>
  <exclusions>
    <exclusion>
      <groupId>javax.transaction</groupId>
      <artifactId>transaction-api</artifactId>
    </exclusion>
  </exclusions>
</dependency>
<dependency>
  <groupId>org.datanucleus</groupId>
  <artifactId>datanucleus-api-jdo</artifactId>
  <version>3.1.3</version>
</dependency>
<dependency>
  <groupId>javax.jdo</groupId>
  <artifactId>jdo-api</artifactId>
  <version>3.0.1</version>
  <exclusions>
    <exclusion>
      <groupId>javax.transaction</groupId>
      <artifactId>transaction-api</artifactId>
    </exclusion>
  </exclusions>
</dependency>

<!-- jsr107cache
<dependency>
  <groupId>net.sf.jsr107cache</groupId>
  <artifactId>jsr107cache</artifactId>
  <version>1.1</version>
</dependency>
-->
A valid and complete pom.xml would be
<?xml version="1.0" encoding="UTF-8"?>
<project xmlns="http://maven.apache.org/POM/4.0.0" xmlns:xsi="http://www.w3.org/2001/XMLSchema-instance"
  xsi:schemaLocation="http://maven.apache.org/POM/4.0.0 http://maven.apache.org/xsd/maven-4.0.0.xsd">

  <modelVersion>4.0.0</modelVersion>
  <packaging>war</packaging>
  <version>0.0.1-SNAPSHOT</version>

  <groupId>your.group.id</groupId>
  <artifactId>your.artificatId</artifactId>

  <properties>
    <app.id>your.app.id</app.id>
    <app.version>your.version</app.version>
    <appengine.version>1.9.20</appengine.version>
    <gcloud.plugin.version>0.9.58.v20150505</gcloud.plugin.version>
    <project.build.sourceEncoding>UTF-8</project.build.sourceEncoding>
  </properties>

  <prerequisites>
    <maven>3.1.0</maven>
  </prerequisites>

  <dependencies>
    <!-- Compile/runtime dependencies -->
    <dependency>
      <groupId>com.google.appengine</groupId>
      <artifactId>appengine-api-1.0-sdk</artifactId>
      <version>${appengine.version}</version>
    </dependency>
    <dependency>
      <groupId>javax.servlet</groupId>
      <artifactId>servlet-api</artifactId>
      <version>2.5</version>
      <scope>provided</scope>
    </dependency>
    <dependency>
      <groupId>jstl</groupId>
      <artifactId>jstl</artifactId>
      <version>1.2</version>
    </dependency>

    <!-- Test Dependencies -->
    <dependency>
      <groupId>com.google.appengine</groupId>
      <artifactId>appengine-testing</artifactId>
      <version>${appengine.version}</version>
      <scope>test</scope>
    </dependency>
    <dependency>
      <groupId>com.google.appengine</groupId>
      <artifactId>appengine-api-stubs</artifactId>
      <version>${appengine.version}</version>
      <scope>test</scope>
    </dependency>

    <!-- javax.jdo
    <dependency>
      <groupId>com.google.appengine.orm</groupId>
      <artifactId>datanucleus-appengine</artifactId>
      <version>2.1.2</version>
    </dependency>
    <dependency>
      <groupId>org.datanucleus</groupId>
      <artifactId>datanucleus-core</artifactId>
      <version>3.1.3</version>
      <scope>runtime</scope>
      <exclusions>
        <exclusion>
          <groupId>javax.transaction</groupId>
          <artifactId>transaction-api</artifactId>
        </exclusion>
      </exclusions>
    </dependency>
    <dependency>
      <groupId>org.datanucleus</groupId>
      <artifactId>datanucleus-api-jdo</artifactId>
      <version>3.1.3</version>
    </dependency>
    <dependency>
      <groupId>javax.jdo</groupId>
      <artifactId>jdo-api</artifactId>
      <version>3.0.1</version>
      <exclusions>
        <exclusion>
          <groupId>javax.transaction</groupId>
          <artifactId>transaction-api</artifactId>
        </exclusion>
      </exclusions>
    </dependency>
    -->
    <!-- jsr107cache
    <dependency>
      <groupId>net.sf.jsr107cache</groupId>
      <artifactId>jsr107cache</artifactId>
      <version>1.1</version>
    </dependency>
    -->
  </dependencies>

  <build>
    <!-- for hot reload of the web application -->
    <outputDirectory>${project.build.directory}/${project.build.finalName}/WEB-INF/classes</outputDirectory>
    <pluginManagement>
      <plugins>
        <plugin>
          <groupId>org.codehaus.mojo</groupId>
          <artifactId>versions-maven-plugin</artifactId>
          <version>2.1</version>
          <executions>
            <execution>
              <phase>compile</phase>
              <goals>
                <goal>display-dependency-updates</goal>
                <goal>display-plugin-updates</goal>
              </goals>
            </execution>
          </executions>
        </plugin>
        <plugin>
          <groupId>org.apache.maven.plugins</groupId>
          <version>3.1</version>
          <artifactId>maven-compiler-plugin</artifactId>
          <configuration>
            <source>1.7</source>
            <target>1.7</target>
          </configuration>
        </plugin>
        <plugin>
          <groupId>org.apache.maven.plugins</groupId>
          <artifactId>maven-war-plugin</artifactId>
          <version>2.4</version>
          <configuration>
            <archiveClasses>true</archiveClasses>
            <webResources>
              <!-- in order to interpolate version from pom into appengine-web.xml -->
              <resource>
                <directory>${basedir}/src/main/webapp/WEB-INF</directory>
                <filtering>true</filtering>
                <targetPath>WEB-INF</targetPath>
              </resource>
            </webResources>
          </configuration>
        </plugin>

        <plugin>
          <groupId>com.google.appengine</groupId>
          <artifactId>appengine-maven-plugin</artifactId>
          <version>${appengine.version}</version>
          <configuration>
            <enableJarClasses>false</enableJarClasses>
            <version>${app.version}</version>
            <!-- Comment in the below snippet to bind to all IPs instead of just
              localhost -->
            <!-- address>0.0.0.0</address> <port>8080</port -->
            <!-- Comment in the below snippet to enable local debugging with a
              remote debugger like those included with Eclipse or IntelliJ -->
            <!-- jvmFlags> <jvmFlag>-agentlib:jdwp=transport=dt\_socket,address=8000,server=y,suspend=n</jvmFlag>
              </jvmFlags -->
          </configuration>
        </plugin>
        <plugin>
          <groupId>com.google.appengine</groupId>
          <artifactId>gcloud-maven-plugin</artifactId>
          <version>${gcloud.plugin.version}</version>
          <configuration>
            <set\_default>true</set\_default>
          </configuration>
        </plugin>
      </plugins>
    </pluginManagement>
    <plugins>
      <plugin>
        <groupId>com.google.appengine</groupId>
        <artifactId>appengine-maven-plugin</artifactId>
      </plugin>
    </plugins>
  </build>
</project>
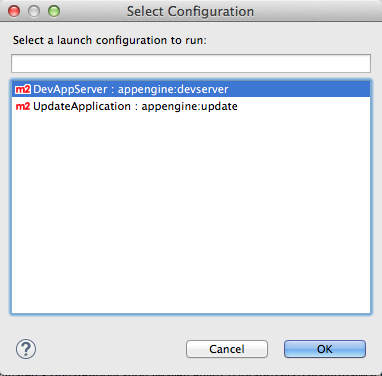
The best way to build and run the project from within Eclipse is to right click on the project, select Run As, then select Maven Build
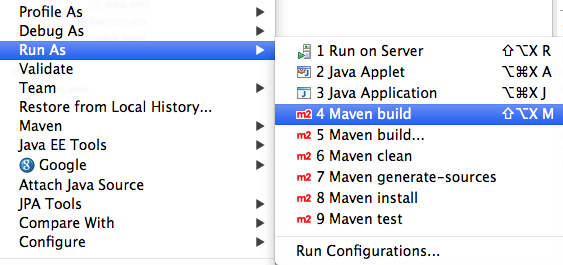
Then select DevAppServer: appengine:devserver configuration.
Finally,
[INFO] Information: Full scan of the web app in place every 5s.
[INFO] jun 04, 2015 8:58:51 PM com.google.appengine.tools.development.AbstractModule startup
[INFO] Information: Module instance default is running at http://localhost:8080/
[INFO] jun 04, 2015 8:58:51 PM com.google.appengine.tools.development.AbstractModule startup
[INFO] Information: The admin console is running at http://localhost:8080/\_ah/admin
[INFO] jun 04, 2015 8:58:51 PM com.google.appengine.tools.development.DevAppServerImpl doStart
[INFO] Information: Dev App Server is now running
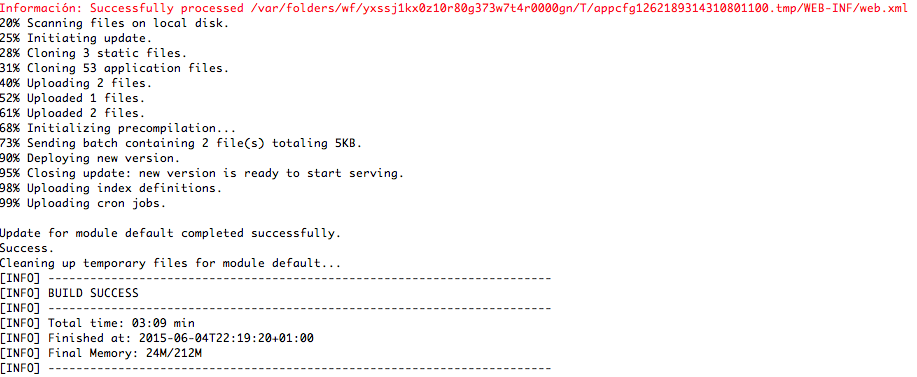
If you want to deploy the project, right click again on the project, select Run As, then select Maven Build and select UpdateApplication: appengine:update configuration. Previously, you have to update the tags application and version in your appengine-web.xml file with the name and version of your GAE project.
The first time you deploy the project, you will have to authenticate using a google account in your browser. Then you will shown with a long string that you will paste next to Please enter code, as you can see in the following image:

This is the result of a successfully deployment.
Related posts